| Предыдущая тема :: Следующая тема |
| Автор |
Сообщение |
hacksawbob 


Зарегистрирован: 28.02.2007
Сообщения: 1293
Откуда: LANCS UK
|
 Отправлено: Пн Окт 06, 2008 6:57 pm Заголовок сообщения: Digital workflow from a pro |
|
Отправлено: Пн Окт 06, 2008 6:57 pm Заголовок сообщения: Digital workflow from a pro |
|
|
hacksawbob wrote:
I went on a two day course with Lovegrove consulting and thought I would share with you the basic workflow for a high volume operation involved mainly in wedding photography. This is not maybe suitable for us low volume shooters (ie less than 500 shots in a day) but it may give you an insight into how one of the pro outfits do it.
Shoot the wedding in SRGB! (better for skin tones apparantly, they were all 5d shooters by the way seems to be th ee de facto wedding camera)
Transfer RAW files from card/s to External hard disk conected via Firewire 800
Import all the files into a catalog in LR but leave the actual raw files on the external drive.
select your best shots by flagging them in LR
rename the files you want to keep with the clients name and a number by selecting all the flagged pictures.
copy the renamed files from the external drive to a local hard disk, either leaving the unwanted ones on the external drive or copying them to an "unwanted folder on the local disk if space permits.
Edit the raw files in lightroom for global colour/vignette/mono conversions etc
Export the LR edited files in uncompressed TIFF 16 bit if significant manipulation required in PS or 8 bit if minimal adjustments interestingly they chose this stage to go from SRGB to Adobe RGB, which puzzled me somewhat but they said that that is what they have found to suit their style/skintones etc.
do healing cloning cosmetic retouching etc in PS
they saved the images for the printers as highest quality JPGs applying any sharpening at this stage. they also had some adjustments based on test patterns that they had sent to each commercial printer they used ie they found one printing firm darkened them %16 so they boosted the dark point in curves to compensate for it.
_________________
LENS LIST |
|
| Наверх |
|
 |
piticu

Зарегистрирован: 04.08.2008
Сообщения: 591
Откуда: Romania
|
Отправлено: Пн Окт 06, 2008 7:57 pm Заголовок сообщения: |
|
Отправлено: Пн Окт 06, 2008 7:57 pm Заголовок сообщения: |
|
|
piticu wrote:
Interesting to know that. I think that everybody has a more or less the same workflow suited to his/hers taste. IE, for me it makes sense to do the downloading/renaming/applying metadata/backing up somewhere else, all of that in the same step, completely automatic. But again, you have to go for what fits your purpose/style/taste better 
_________________
www.atelierelealbe.eu |
|
| Наверх |
|
|
Ballu
Зарегистрирован: 28.02.2007
Сообщения: 912
Откуда: Columbus, OH. USofA
|
Отправлено: Вт Окт 07, 2008 1:08 am Заголовок сообщения: |
|
Отправлено: Вт Окт 07, 2008 1:08 am Заголовок сообщения: |
|
|
Ballu wrote:
| piticu писал(а): |
| Interesting to know that. I think that everybody has a more or less the same workflow suited to his/hers taste.... |
Its interesting... I personally never took any class and/or read any book...
My work flow is (didnt know earlier, we have term for this),
Download all the file to external drive drive connected to home PC (With 350D, I used to take card out.. with XSi, I use USB cable and Canon software).
create a catalog in LR (if using LR, I am using trial copy yet, no plan to buy) or open the directory. Or I open the directory as catalog in Canon software.
Use WB/Contrast/Tone curve (usually auto setting, and move the saturation back to 100, initial value, and sharpening to 0 value).
Convert to TIFF with 16-bit settings.
Open the TIFF file in "Picture Window Pro" ver4.0 software (my paid picture editor not for graphics purposes).
Do all the editing needed: (if needed)
-> Dynamic range stretch, play with mostly pushing mid tones, Brightness curve (S-treatment), color correction if any (doesnt need with RAW processing based work flow, and will try) and sharpening with un-sharp mask technique (very little with lenses I own).
If needed, play with saturation (which I have rarely used).
Save in full JPEG option.
(and upload pic to Flickr & show here... I dont have any client to show/sell  )
I think, its RAW processing which makes all the difference. I have noticed, for skin tones, flash captures and indoor shots/snapshots, JPEG results, directly from 450D camera are good.
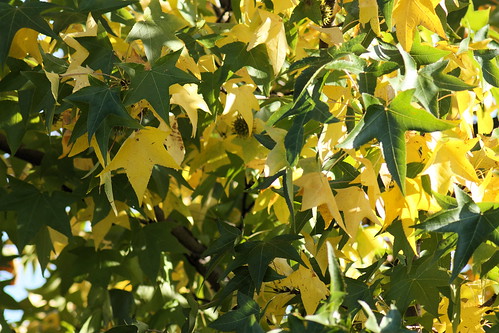
See the difference here,
(Captured with Pentacon 200mm f4, preset lens with interchangable mount.. used M42 mount)
Direct JPEG, with default setting, post processing:

result with RAW captured file and processed with Canon software and Picture window pro.
_________________
-Ballu
http://balyanpage.blogspot.com/ |
|
| Наверх |
|
|
patrickh


Зарегистрирован: 23.08.2007
Сообщения: 8551
Откуда: Oregon
Expire: 2011-11-18
|
Отправлено: Вт Окт 07, 2008 4:41 am Заголовок сообщения: |
|
Отправлено: Вт Окт 07, 2008 4:41 am Заголовок сообщения: |
|
|
patrickh wrote:
Ballu
To my eye the RAW to jpg wins hands down - more detail, better contrast and more realistic colors.
patrickh
_________________
DSLR: Nikon D300 Nikon D200 Nex 5N
MF Zooms: Kiron 28-85/3.5, 28-105/3.2, 75-150/3.5, Nikkor 50-135/3.5 AIS // MF Primes: Nikkor 20/4 AI, 24/2 AI, 28/2 AI, 28/2.8 AIS, 28/3.5 AI, 35/1.4 AIS, 35/2 AIS, 35/2.8 PC, 45/2.8 P, 50/1.4 AIS, 50/1.8 AIS, 50/2 AI, 55/2.8 AIS micro, 55/3.5 AI micro, 85/2 AI, 100/2,8 E, 105/1,8 AIS, 105/2,5 AIS, 135/2 AIS, 135/2.8 AIS, 200/4 AI, 200/4 AIS micro, 300/4.5 AI, 300/4.5 AI ED, Arsat 50/1.4, Kiron 28/2, Vivitar 28/2.5, Panagor 135/2.8, Tamron 28/2.5, Tamron 90/2.5 macro, Vivitar 90/2.5 macro (Tokina) Voigtlander 90/3.5 Vivitar 105/2.5 macro (Kiron) Kaleinar 100/2.8 AI Tamron 135/2.5, Vivitar 135/2.8CF, 200/3.5, Tokina 400/5,6
M42: Vivitar 28/2.5, Tamron 28/2.5, Formula5 28/2.8, Mamiya 28/2.8, Pentacon 29/2.8, Flektogon 35/2.4, Flektogon 35/2.8, Takumar 35/3.5, Curtagon 35/4, Takumar 50/1.4, Volna-6 50/2.8 macro, Mamiya 50/1.4, CZJ Pancolar 50/1,8, Oreston 50/1.8, Takumar 50/2, Industar 50/3.5, Sears 55/1.4, Helios 58/2, Jupiter 85/2, Helios 85/1.5, Takumar 105/2.8, Steinheil macro 105/4.5, Tamron 135/2.5, Jupiter 135/4, CZ 135/4, Steinheil Culminar 135/4,5, Jupiter 135/3.5, Takumar 135/3.5, Tair 135/2.8, Pentacon 135/2.8, CZ 135/2.8, Taika 135/3.5, Takumar 150/4, Jupiter 200/4, Takumar 200/4
Exakta: Topcon 100/2.8(M42), 35/2.8, 58/1.8, 135/2.8, 135/2.8 (M42), Kyoei Acall 135/3.5
C/Y: Yashica 28/2.8, 50/1.7, 135/2.8, Zeiss Planar 50/1.4, Distagon 25/2.8
Hexanon: 28/3.5, 35/2.8, 40/1.8, 50/1.7, 52/1.8, 135/3.2, 135/3.5, 35-70/3.5, 200/3.5
P6 : Mir 38 65/3.5, Biometar 80/2.8, Kaleinar 150/2.8, Sonnar 180/2.8
Minolta SR: 28/2.8, 28/3.5, 35/2.8, 45/2, 50/2, 58/1.4, 50/1.7, 135/2.8, 200/3.5
RF: Industar 53/2.8, Jupiter 8 50/2
Enlarg: Rodagon 50/5,6, 80/5,6, 105/5.6, Vario 44-52/4, 150/5.6 180/5.6 El Nikkor 50/2,8,63/2.8,75/4, 80/5,6, 105/5.6, 135/5.6 Schneider 60/5.6, 80/5.6, 80/4S,100/5.6S,105/5.6,135/5.6, 135/5.6S, 150/5.6S, Leica 95/4 |
|
| Наверх |
|
|
Orio

Зарегистрирован: 24.02.2007
Сообщения: 29545
Откуда: West Emilia
Expire: 2012-12-04
|
Отправлено: Вт Окт 07, 2008 5:01 am Заголовок сообщения: |
|
Отправлено: Вт Окт 07, 2008 5:01 am Заголовок сообщения: |
|
|
Orio wrote:
It is possible to obtain different colours from incamera jpg by choosing a different profile or making your own.
Having that said, of course RAW is the way to go.
_________________
Orio, Administrator
T*
NE CEDE MALIS AUDENTIOR ITO
Ferrania film is reborn! http://www.filmferrania.it/
Support the Ornano film chemicals company and help them survive!
http://forum.mflenses.com/ornano-chemical-products-t55525.html |
|
| Наверх |
|
|
Rob Leslie
Зарегистрирован: 20.03.2007
Сообщения: 1103
Откуда: UK Swindon
|
Отправлено: Вт Окт 07, 2008 10:35 am Заголовок сообщения: |
|
Отправлено: Вт Окт 07, 2008 10:35 am Заголовок сообщения: |
|
|
Rob Leslie wrote:
I really think this part is useful !!!
'Shoot the wedding in SRGB! '
'Transfer RAW files from card/s'
‘Go from SRGB to Adobe RGB, which puzzled me somewhat’
Yes puzzled me as well.
How can you go from a lower info colour space to a higher one and see any advantage, or difference? The other way round yes.
Sounds like a great course!
_________________
Pentax K10D & K100D. Many Tamron Adaptall SP lenses, Fujinon f4.5 400mm. A loved Lens Baby 2, Lubitel triplet +++ and many film cameras. Mainly a Digital user inc G5, GR2
http://robstreet.blogspot.com/
http://robleslie.blogspot.com/
http://roblesliephotography.blogspot.com/
http://www.flickr.com/photos/64956578@N00/ |
|
| Наверх |
|
|
piticu
Зарегистрирован: 04.08.2008
Сообщения: 591
Откуда: Romania
|
Отправлено: Вт Окт 07, 2008 1:09 pm Заголовок сообщения: |
|
Отправлено: Вт Окт 07, 2008 1:09 pm Заголовок сообщения: |
|
|
piticu wrote:
Till now, the best source i've found on this subject is Bettina & Uwe Steinmueller's Digital Photography Workflow Handbook, even outdated a little bit it worths every penny. Also a good read is The DAM Book.
_________________
www.atelierelealbe.eu |
|
| Наверх |
|
|
LucisPictor
Зарегистрирован: 26.02.2007
Сообщения: 17633
Откуда: Oberhessen, Germany / Maidstone ('95-'96)
Expire: 2013-12-03
|
Отправлено: Вт Окт 07, 2008 2:42 pm Заголовок сообщения: |
|
Отправлено: Вт Окт 07, 2008 2:42 pm Заголовок сообщения: |
|
|
LucisPictor wrote:
After a while everybody find his own workflow.
I shoot in RAW + medium JPG. The JPGs for quick access on any computer and the RAW for serious PP.
Then I mostly use ACR, sometimes DPP for RAW processing ans Photoshop to post process.
_________________
Personal forum activity on pause every now and again (due to job obligations)!
Carsten, former Moderator 
Things ON SALE
Carsten = "KAPCTEH" = "Karusutenu" | T-shirt?.........................My photos from Emilia: http://www.schouler.net/emilia/emilia2011.html
My gear: http://retrocameracs.wordpress.com/ausrustung/
Old list: http://forum.mflenses.com/viewtopic.php?t=65 (Not up-to-date, sorry!) | http://www.lucispictor.de | http://www.alensaweek.wordpress.com |
http://www.retrocamera.de |
|
| Наверх |
|
|
Ballu
Зарегистрирован: 28.02.2007
Сообщения: 912
Откуда: Columbus, OH. USofA
|
Отправлено: Вт Окт 07, 2008 2:42 pm Заголовок сообщения: |
|
Отправлено: Вт Окт 07, 2008 2:42 pm Заголовок сообщения: |
|
|
Ballu wrote:
| Rob Leslie писал(а): |
'Shoot the wedding in SRGB! '
|
Rob, I always like your color treatment. Sometimes, over saturated, but again, its a experimentation and creativity which makes photography unique.
Whats your take, which profile we should use. If you monitor is profiled by yourself, how to choose the profile. I care less about web, I am planning to move to print now.
_________________
-Ballu
http://balyanpage.blogspot.com/ |
|
| Наверх |
|
|
Rob Leslie
Зарегистрирован: 20.03.2007
Сообщения: 1103
Откуда: UK Swindon
|
Отправлено: Вт Окт 07, 2008 3:02 pm Заголовок сообщения: |
|
Отправлено: Вт Окт 07, 2008 3:02 pm Заголовок сообщения: |
|
|
Rob Leslie wrote:
The point was 'Shoot the wedding in SRGB, then download the RAW files'.
RAW does not need any camera colour settings to be made. All such settings are controlled in the RAW converter.
If your 'Default' RAW coversion is in AdobeRGB then the fact is the camera setting of SRGB is ignored. So it is a bit of nonsense, even more so if your working profile in Photoshop is Abobe RGB and why would anybody work in a lower profile unless they were only ever posting to the net or having prints made on a Fuji lab machine?
I work in Photoshop with Abobe RGB and print in Abobe RGB. I convert to SRGB for web posting and use Photoshop 'Save for web'
I sometimes switch to Pro Colour colour space in the RAW converter because it does give more control over colours and highlights. My PS is set to convert the file to Abobe as it opens in PS.
The advatages of doing a conversion in an other profile are not lost as long as you have PS colour preferences set right.
I only ever shoot RAW
I have used RAW almost exclusively since 2003 when I bought a Canon G3. The G3 was a bit slow and memory wasn’t as cheap as it is today but shooting RAW was always worthwhile. About the only times I have shot JPEG I have regretted it as any good shot is 10 times as good with your own adjustments rather than what the camera ‘Intelligence’ thinks it should be.
Best on-line write ups about using Colour profiles, RAW, conversion etc etc are to be found at the Luminous Landscape site.
They also do a very good six and a half hour download on the subject 'Camera to Print'
_________________
Pentax K10D & K100D. Many Tamron Adaptall SP lenses, Fujinon f4.5 400mm. A loved Lens Baby 2, Lubitel triplet +++ and many film cameras. Mainly a Digital user inc G5, GR2
http://robstreet.blogspot.com/
http://robleslie.blogspot.com/
http://roblesliephotography.blogspot.com/
http://www.flickr.com/photos/64956578@N00/
Последний раз редактировалось Rob Leslie Вт Окт 07, 2008 3:31 pm; всего правок: 1 |
|
| Наверх |
|
|
poilu
Зарегистрирован: 26.08.2007
Сообщения: 10476
Откуда: Greece
Expire: 2019-08-29
|
Отправлено: Вт Окт 07, 2008 3:18 pm Заголовок сообщения: |
|
Отправлено: Вт Окт 07, 2008 3:18 pm Заголовок сообщения: |
|
|
poilu wrote:
I don't shot in SRGB, I prefer raw film
I import all files in a catalog leaving the actual raw on negatives
I use 'save for web' to convert for internet
when I want b&w, I just put a b&w film
if I want different colors, I use different film
_________________
T* |
|
| Наверх |
|
|
Rob Leslie
Зарегистрирован: 20.03.2007
Сообщения: 1103
Откуда: UK Swindon
|
Отправлено: Вт Окт 07, 2008 3:33 pm Заголовок сообщения: |
|
Отправлено: Вт Окт 07, 2008 3:33 pm Заголовок сообщения: |
|
|
Rob Leslie wrote:
| poilu писал(а): |
I don't shot in SRGB, I prefer raw film
I import all files in a catalog leaving the actual raw on negatives
I use 'save for web' to convert for internet
when I want b&w, I just put a b&w film
if I want different colors, I use different film |
What Colour profile do you Scan in?
_________________
Pentax K10D & K100D. Many Tamron Adaptall SP lenses, Fujinon f4.5 400mm. A loved Lens Baby 2, Lubitel triplet +++ and many film cameras. Mainly a Digital user inc G5, GR2
http://robstreet.blogspot.com/
http://robleslie.blogspot.com/
http://roblesliephotography.blogspot.com/
http://www.flickr.com/photos/64956578@N00/ |
|
| Наверх |
|
|
piticu
Зарегистрирован: 04.08.2008
Сообщения: 591
Откуда: Romania
|
Отправлено: Вт Окт 07, 2008 3:36 pm Заголовок сообщения: |
|
Отправлено: Вт Окт 07, 2008 3:36 pm Заголовок сообщения: |
|
|
piticu wrote:
| Rob Leslie писал(а): |
| […]So it is a bit of nonsense, even more so if your working profile in Photoshop is Abobe RGB and why would anybody work in a lower profile unless they were only ever posting to the net or having prints made on a Fuji lab machine? |
It's true that color profile set in camera doesn't matter if you shoot raw EXCEPT for quick checking of the pictures on spot. The preview that camera shows respects all the settings in the camera: sharpness, saturation, contrast, color profile etc.
_________________
www.atelierelealbe.eu |
|
| Наверх |
|
|
Rob Leslie
Зарегистрирован: 20.03.2007
Сообщения: 1103
Откуда: UK Swindon
|
Отправлено: Вт Окт 07, 2008 4:21 pm Заголовок сообщения: |
|
Отправлено: Вт Окт 07, 2008 4:21 pm Заголовок сообщения: |
|
|
Rob Leslie wrote:
| piticu писал(а): |
| Rob Leslie писал(а): |
| […]So it is a bit of nonsense, even more so if your working profile in Photoshop is Abobe RGB and why would anybody work in a lower profile unless they were only ever posting to the net or having prints made on a Fuji lab machine? |
It's true that color profile set in camera doesn't matter if you shoot raw EXCEPT for quick checking of the pictures on spot. The preview that camera shows respects all the settings in the camera: sharpness, saturation, contrast, color profile etc. |
More to the point is that Camera settings are used by the manufactures ‘Default RAW converter.
I am aware that a few use RAW only as quality non compressed file format and have never turned the Defaults of the RAW converter off.
_________________
Pentax K10D & K100D. Many Tamron Adaptall SP lenses, Fujinon f4.5 400mm. A loved Lens Baby 2, Lubitel triplet +++ and many film cameras. Mainly a Digital user inc G5, GR2
http://robstreet.blogspot.com/
http://robleslie.blogspot.com/
http://roblesliephotography.blogspot.com/
http://www.flickr.com/photos/64956578@N00/ |
|
| Наверх |
|
|
piticu
Зарегистрирован: 04.08.2008
Сообщения: 591
Откуда: Romania
|
Отправлено: Вт Окт 07, 2008 4:58 pm Заголовок сообщения: |
|
Отправлено: Вт Окт 07, 2008 4:58 pm Заголовок сообщения: |
|
|
piticu wrote:
| Rob Leslie писал(а): |
| More to the point is that Camera settings are used by the manufactures ‘Default RAW converter. |
Ya, for example Nikon CaptureNX does that
_________________
www.atelierelealbe.eu |
|
| Наверх |
|
|
|
|
 Русский
 Español
 中文
 Magyar
 Deutsch
 日本語
 Français


